Newcomers 2013

2013 did not bring any calm to my everlasting need to discover old camera’s. I did put a limit to my cravings and decided not to buy more than 3 camera’s this year. Good decision. So, we’re halfway the year, and I’m at 3! Here’s some info on the new members of my collection:

Image

The first one i decided to buy was the Konica c35 EF. I actually bought the same camera in the slightly older model last year, but unfortunately the flash wasn’t functional, which was one of the reasons for buying it. It’s the first compact camera with an automatic flash, so the flash should work, is what I thought! So, i found this very well taken care of gem online, and bought it for €15! It’s almost mint condition and no corrosion whatsoever in the battery department. If your camera does have some corrosion, you can clean it using Q-tips and white vinegar. But i would advice against buying one that has a lot of corrosion that has already turned dark or damaged the contacts. There’s also a cell battery compartment for the operation of the camera itself. You can choose to operate the camera without, since it isn’t completely automatic, but then again… that’s not what the camera was made for. They don’t make the mercury cell batteries anymore that it needs to operate pseudo-automatically, which is a great thing for the environment, and you can find a good replacement wherever you can find hearing aid batteries. A 1.3 or 1.4 volt zinc battery should be fine according to this Flickr thread.

This camera used to be one of Warhol’s favorites! There are plenty of pictures of him at events clutching the Konica c35 EF. In fact, it is said he liked it so much, he had 2. I’ll just have to wait and see the results of this camera to decide if i agree!

Image

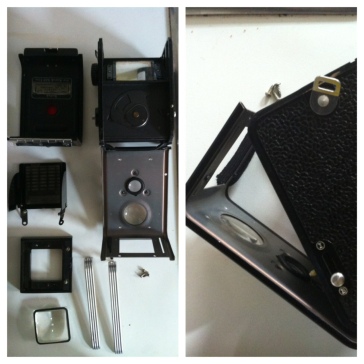
The second newcomer is this lovely Kodak Duaflex II. It’s a pseudo-TLR which means you have a large viewfinder on top, but actually it’s a simple point-and-shoot camera. The shutter speed is estimated around 1/30 or 1/40, as it is for most oldtimers like this. The camera was produced in the first half of the fifties, and is made from bakelite and metal, I don’t really know. What i do know is that most of these camera’s need a good cleaning before use, and thus I took this baby apart and cleaned it carefully with a dust cloth and some water (i didn’t use anything else since i didn’t find it necessary to use products. If you do, please don’t use any on the mirror. There’s a good chance that you might damage it. I found the disassembling pretty self-explanatory; some screws on top, some screws on the bottom and the rest didn’t have screws. Some models have some screws on the front but with this model, the front panel could be opened up completely as you can see below. Easy does it!

Image

Now it is pretty clean, except for the mirror that was pretty damaged. I put in some film after trimming a 120 film of lomography (I would strongly advise against this brand since in the pack I bought to try it, one film ripped and now this film doesn’t have all his numbers printed… Thanks a lot :/ ). Some people respool the film onto a 620 spool, but I found it easier to trim the edges of the 120 spool and file it to the same width as a 620. You can find a mod here.

Image

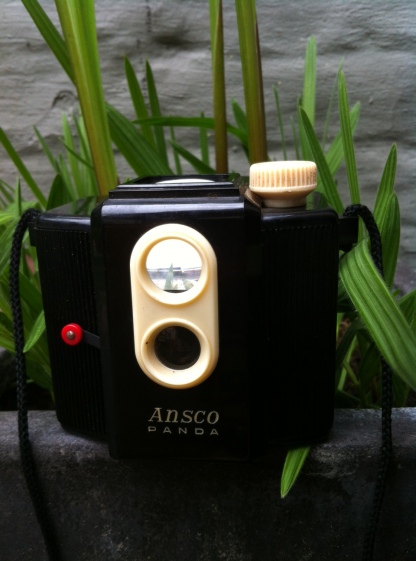
And last but not least I got to buy the rare but cute Ansco Panda camera. It’s also a 620 pseudo-TLR, point-and-shoot camera with an estimated shutter speed of 1/30 or 1/40. It could also use a cleaning, but since it’s a bakelite/plastic camera, it has no screws so we’ll have to make do with a nice foggy effect on the pictures, like we’re seeing today through the era of yesterday. It’s a pretty straightforward camera so I can’t tell you many exciting stories about it (yet?), but it’s not easy to come by these camera’s these days so I’m totally excited and happy to have one of them in my possession, with bag and everything. Oh yes, I got all 3 camera’s in their original camera cases. Score!

Photo march ’12 (1)

Ik presenteer, een van de snelst opgetrokken filmpjes in de historie van mijn bestaan: mijn instamatic 36 testrol! En dankzij DIT filmpje hoef ik u helemaal niet zelf uit te leggen hoe ik dat heb aangepakt! Geloof me, het is lang niet zo moeilijk als het op het eerste zicht lijkt 😉 En als je gewoon slechts één maal aan je wieltje draait, heb je leuke dubbel belichte foto’s!

Geen idee waarom op bepaalde foto’s mijn film zich heeft gedragen alsof die ergens in de jaren ’80 vervallen was, maar ik heb daar niets op tegen!

Deze slideshow vereist JavaScript.

Probleem.

Hallo, mijn naam is Celine, en ik ben verslaafd aan oude camera’s. Hoe slechter de kwaliteit, hoe beter.

Vanmorgen kwam ik een advertentie tegen van een Eura Ferrania die te koop stond. Bij de verkoper thuis aangekomen, bleek deze man en zijn superschattige windhond-pup tevens van zijn Chinon 35F-EE , Sincere L-100CM en plastic flash te willen worden verlost voor een symbolische prijsstijging. En welke junk kan er nu neen zeggen tegen goodies die je zo goed als gratis worden in de schoot gegooid? Het was al een flinke maand geleden sinds ik 2 Kodak Instamatics en een random yves rocher (wtf?) camera vond… Het vlees is zwak!

Ziehier mijn trouvaille waarvoor ik online smolt:

Meer info? Klik op de foto en ga naar Camerapedia!

Jawel, je ziet het goed, een échte plastic camera. Een voorouder van de Diana’s en Holga’s waarmee ze je om de oren slaan tegenwoordig. An original. Van mij. Helemaal van mij. En oh so fancy. De nieuwe camera’s krijgen dan nu wel zebrastrepen en meer van die decoratie, geen enkele ziet er zo strak uit als deze Italiaanse schoonheidskoningin.

Weten hoe de resultaten er met deze dame uitzien? Klik hier!

Maar zoals ik u vertelde… The best things in life come in threes! Een Sincere L-100CM was ook van de partij:

Meer info? Klik om naar catawiki te gaan!

Deze camera was iets moeilijker te researchen via internet… Blijkbaar is het een camera die uit Europa stamt en blijkbaar zijn de meeste Europeanen geen show offs zoals ik. Gelukkig stond er wel een mini scheutje info op catawiki en ook op het Lomotion forum, en kon ik op Lomography.com zien wat voor resultaten een andere persoon uit deze camera had zien te persen. Wees welkom, zusje van de Time magazine camera!

En ten slotte, een Chinon 35F-EE, jammer genoeg bedelend naar nieuwe batterijen en een kleine reparatie (film hendel ontbreekt). Maar gezien het waarschijnlijk nog een jaar of 2 zal duren eer ik al mijn camera’s heb kunnen gebruiken, heb ik daar geen probleem mee!

Meer info? Klik op de foto om naar camerawiki te gaan!

En last but not least: een plastic flitser. Halleluja, want mijn andere flits weegt zwaarder dan ikzelf, en dat werkt niet bepaald handig met plastic camera’s!

Zo, hopelijk laat ik u nu niet alleen stikjaloers achter, maar bent u ook een paar websites rijker waar je info kunt vinden over toycamera’s 😉

Lists & Lists: Voornemens // New Year’s Resolutions

Click here for English version!

Het is weer die tijd van het jaar waarop je terugblikt op alles dat er de voorbije 12 maand is gebeurd en jezelf veroordeelt/beoordeelt voor hoe je deed. Op mezelf heb ik eigenlijk niet veel op te merken (ik ben van nature een tolerante persoonlijkheid, zo noem ik dat), maar toch wil ik het komende jaar meer maken van om maar te beginnen…

Mijn reeks fototoestellen!

Ok, niet dat ik zo’n mooie lijst heb als vele anderen, maar om niet bezig te zijn met fotografie, wel te veel. Ik heb namelijk 2 Praktika’s, een SuperTL3 en een TL1000 (nog steeds dank aan Dick Nenoo voor de tweede ❤ ). Mét dan nog een externe flash die ik momenteel zelfs niet kan lokaliseren. “Shame on me”; het zou me meer moeten gezegd worden! Mede omdat beide toestellen echt al véél prachtige foto’s hebben afgeleverd. Zoals een groepje Aziatische toeristen met elk een rood zakje. Was de vlag van Japan maar een rood zakje ipv een rode bol!

Blijkbaar heb ik zelfs nog niet de helft ingescand. Schandalig zegt u? Dat zeg ik ook, wees gerust.

Daarnaast heb ik ook de beroemde Diana F+, die ik deze vakantie gewoonweg in Leuven liet liggen. U mag het opnieuw zeggen: schan-da-leus! Het laatste half jaar heb ik hem maar 1 of 2 keer boven gehaald, en mijn laatste diafilm ligt nog steeds te wachten op ontwikkeling (en is waarschijnlijk al grondig beschadigd… Maar dat noemen ze gelukkig gewoon “lomografie” tegenwoordig). Zéér schandaleus want dit fototoestel gaf mij nog méér de macht om compleet awesome foto’s te produceren! Daarnaast is dat ook niet het enige Lomo-toestel dat ik liggen heb, deze zomer tikte ik in een rommelwinkeltje in Finland in het meest verlaten dorp ooit een anoniem geval op de kop, waar ik nu hooguit 3 foto’s mee getrokken heb, terwijl er normale 35mm film in kan. ’t Is al gezegd maar toch: schan-da-leus!

Dan heb ik ook nog een analoge Nikon F70, die jarenlang mijn allerbeste vriend is geweest op pad, en nu ligt te verkommeren in een kast.

En tenslotte mijn recentelijk herontdekte Fuji Instax Instant camera, zoals u hier kon lezen! Maar die mag ik niet té vaak gebruiken, of deze hier is binnen een paar maand armer dan platzak.

Dat maakt op zich al 6 onwerkelijk formidabele, maar zwaar tekort gedane analoge toestellen en nog een aantal mapjes proofings die ik nog niet gedigitaliseerd heb. En dan heb ik natuurlijk ook nog een digitaal fototoestel liggen, en een wegwerp kodak sinds gisteren, want ik ben toen reeds aan mijn voornemen begonnen, en miste mijn fototoestellen in Leuven zo hard dat ik iets anders nodig had of de dure Fuji Instax foto’s gingen er al door zijn!

U ziet, het wordt een jaar 2012 met véél uit de lens kijken geblazen! Wat moet, moet!

Go to my Twitter – Facebook – Bloglovin’

Kringloop meets naald&draad (4): Jeans wordt rok // Refashion: jeans to skirt!

Vanmorgen kwam ik deze tutorial tegen, en ik moest hem gewoon dadelijk proberen, wachten was geen optie! Ondanks dat de blog in het Russisch/Tsjechisch/wat dan ook geschreven is, is het filmpje meer dan duidelijk genoeg om dadelijk je eigen oude jeans aan flarden te knippen en tot een rokje om te toveren! Bij mij was de klus op een goeie 30 minuten geklaard, en kan niet wachten een donkerdere versie te maken met hoge taille! Succes!

// This morning I saw this tutorial online, and I just had to try it immediately, waiting was no option! Despite the fact that the blog is written in Russian or whatever language I don’t speak, the video is more than clear enough to start cutting up your old jeans right away and turn it into a fashionable skirt! I did the job in 30 minutes, and I can’t wait to make a darker version with a high waist! Good luck!

Volg mijn blog met bloglovin! // Follow my blog with bloglovin!

Kringloop meets Naald&Draad (3): Rushes aannaaien! // Sewing Ruffles!

(Scroll down for English)

Het viel jullie misschien al op dat Adventures in Dressmaking een grote inspiratiebron is geworden voor mij 😛 De blog inspireerde me niet enkel om een Peter Pankraagje te naaien, maar ook om een oud onflatterend t-shirt om te toveren in een superhip wél flatterend t-shirt! Wat 10 min met je stikmachine niet kunnen veranderen…

Mijn materiaal voor de rushes was eenvoudig katoen, van de mouwen van een oud mannenhemd in de kringloop dat ik aan het omtoveren ben in een niet-zo-hip-maar-erg-comfy zomerkleedje. Momenteel sta ik zo ver als… De mouwen die afgeknipt zijn 😛

Gedaan met kletsen, hoe ga je nu te werk? Op Adventures in Dressmaking staan goede handleidingen voor rushes maar gezien ik met katoen werkte en geen uitrafelende randjes wou, heb ik zelf een manier gezocht. Blijkt dat rushes van katoen op een stretch t-shirt naaien echt poepsimpel is!

1) Snij een strook (of 2, afhankelijk van hoe lang/kort je materiaal is) van 8 cm (of minder, zoals je zelf wilt!). Je hebt dubbel zoveel stof nodig als de lengte van de hals van je t-shirt.

2) Vouw de stof met de goede kant naar binnen dubbel en stik over de rand. Draai binnenste buiten en strijk plat met de naad in het midden.

3) Naai de 2 uiteindes aan elkaar (ik deed dit met een eenvoudige V-steek dubbel naast elkaar op de stof die ongeveer 1cm onder elkaar lag met de rand naar binnen gevouwd. ‘k Vind dat eigenlijk nog een schoon effect.) Dit stukje heb ik vastgespeld in het midden van de achterkant van m’n t-shirt.

4) Zoek het midden van de strook. Deze heb ik in 3 plooitjes over elkaar gedaan zodat het op dat punt slechts een 2-3 cm breed was. Gezien ik met een V-nek zat, was dat (volgens mij) de mooiste oplossing. Dit stukje heb ik dan vast gezet op ongeveer dezelfde manier als de achterkant: 1x een V-steek 🙂

5) De rest is echt poepsimpel! Stik de katoenen strook over de hals van je stretch t-shirt. Terwijl je dit doet, trek je aan je t-shirt. Je zal zien dat wanneer het katoen vastgenaaid is, dit voor het mooie rushes-effect zoekt. Eigenlijk is het dus alsof je stof op een elastiek naait. Poepsimpel zoals ik zei 😉

Volg mijn blog met Bloglovin!

// It’s probably getting quite obvious that Adventures in Dressmaking is becoming a great source of inspiration for me. For example her multiple tshirts with ruffles. The blog didn’t only inspire me to sew a Peter Pan collar, but also to refresh an old unflattering stretch T-shirt that was on it’s way to the bin. What 10 minutes with a sewing machine can do!

The material I used was some old cotton from the sleeves of a men’s shirt I bought at goodwill to make it into a comfy summerdress. At this point I’ve come as far as… cutting off the sleeves 😛 

Now let’s stop the chatter, how can you yourself do this? You can already find lots of tutorials for sewing rushes at Adventures in Dressmaking but since I was working with plain cotton unlike in her tutorials, and I didn’t want any frays after washing, I just tried it on my own. It turns out to be ridiculously easy to sew cotton ruffles on a stretch t-shirt. Like sewing on an elastic band!

1) Cut a large strip (or two that you can attach to eachother, depending on the fabric you have and the size of your t-shirt) of cotton, and make sure that you have double the fabric of the neckline. (It doesn’t matter if you have too much, it’s always worse to have too little!)

2) Fold the fabric in length (right sides in), sew the open side together and turn right side out.

3) Sew ends together any way you prefer (I did it with a simple double V-stitch). 

4) Look for the middle of the strip. Since that point was going to be sewn onto the lowest point of the V-neck, folded it in 3 parts (halfway onto eachother) so it measured only 3cm approx. and sewed it onto the t-shirt with a V-stitch. 

5) The rest is the easiest part! While attaching the cotton to the t-shirt (sew in the middle of the strip), pull the neckline of the t-shirt towards you. That way the ruffles will be created automatically. Sew the middle of the back last, that way, when you have to much fabric, you can still cut it off and sew the ends together again. I can’t give you any guarantee if double the neckline is enough/too little/too much since every stretch garment gives a different clearance. 

So, now I’ll leave you to it! Good luck, I’m sure you’ll be suprised how easy it is! If you have any questions, feel free to comment!

Follow my blog with bloglovin!

Kringloop meets Naald&Draad (2): Peter Pan kraagjes!

Zoals je al weet waarschijnlijk, heb je in de kringloop meestal een heel rek vol saaie t-shirts hangen die handig en soms echt leuk zijn, maar eigenlijk vooral in de kast liggen en worden gebruikt als werkkledij of onderhemdje (kwestie van het hoerengehalte bij bepaalde topjes tegen te werken 😛 ). Toch kunt ge fantastische dingen maken van een simpel t-shirt, zoals er een Peter Pan kraagje aan naaien, wat dit seizoen héél in is (hoe up to date klink ik!)

Bij het doorspitten van alle tutorials op Adventures in Dressmaking, kwam ik deze superschattige tutorial tegen:

De uitleg is echt héél duidelijk, en eigenlijk is het ook zeer goed te doen met de hand! Zelf gebruikte ik een retro kussensloop uit de kringloop en een €4,99 tanktop uit New Look met dit tot resultaat:

Succes!

Kringloop meets Naald&Draad (1)

Drie jaar geleden kocht ik een lelijk kleed. Nu ja, niet per se lelijk, maar gewoon nogal vormeloos en meters te groot voor me. Ik besloot deze week er iets mee aan te vangen en het knap te maken, en daar mag u van meegenieten. Het project levert u enkele tutorials op die je in de loop van deze maand mag verwachten, namelijk:

Hoe maak je eenvoudig een kledingstuk kleiner?

Een riem maken met gesp.

1/2 pofmouwtjes maken

Kortom, allemaal dingen die van pas komen voor het bewerken van je eigen vormeloze kringloopkleed!
Stay tuned dus 😉